
How to… Lengthen and shorten pattern pieces
My Handmade Wardrobe patterns are drafted for women 5’6” tall, so anyone considerably taller or shorter than that may want to add or remove length in our patterns.
Freya is 5’ 1” so shortening garments is an alteration she’s very used to doing! Don’t worry, this is a really simple thing to do, and we will guide you through the steps!

Most patterns will include ‘lengthen/shorten’ lines on their pattern pieces to help you know where to make the adjustments. You can adjust legs, arms, even bodies. But it is important to make the adjustments in the right place to make sure you don’t change the shape of the garment too much.
On legs you will adjust either at the knee, or evenly at the mid-thigh and mid-calf. You can also add to or reduce the rise of trousers at the hip point.

On bodices the simplest adjustment point is at the waist. It’s always worth avoiding adjusting where darts or other shaping can effect the pattern, as this can complicate the process and might require further adjustments. Keep it simple wherever you can.
On sleeves you can lengthen at the elbow.
Adding Length
Take your pattern pieces when they’ve been cut out to the right size. We will start by cutting the pattern piece in two at the ‘lengthen/shorten’ line.

Take a scrap of paper and draw on two parallel lines. The distance between the lines will need to be the amount extra you are adding into the pattern piece.

Tape one half of your pattern piece down along one line. Then use a ruler to keep the grainline straight as you place the second pattern piece on the other lengthen line. Tape this piece down too.
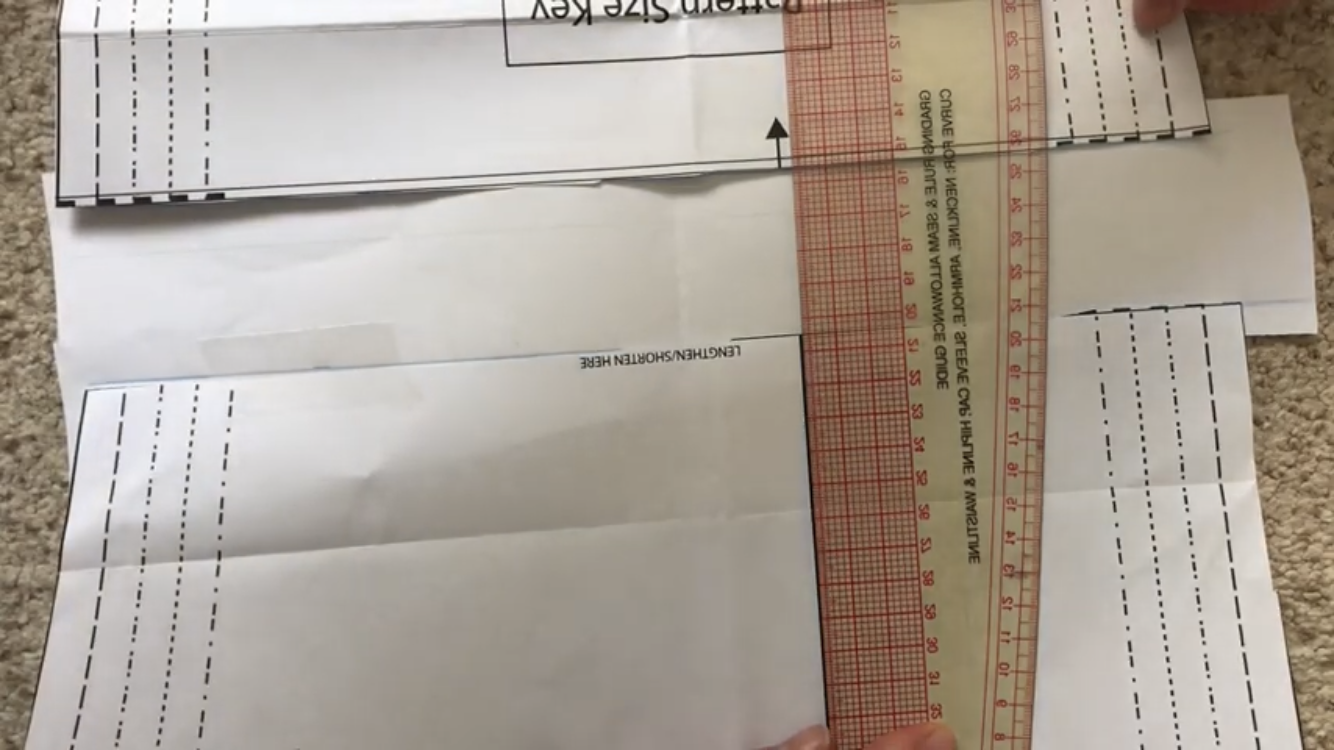
Use your ruler to connect the pattern pieces and draw new cutting lines. Try and maintain the original curve, if you have a dressmakers ruler it is very helpful. If not, a free hand drawn line will be fine too.

Cut off the extra paper at the new lines you’ve drawn and then your pattern pieces is ready to use!
Removing Length
With pattern pieces cut to the right size, measure up from the ‘lengthen/shorten’ line the total amount you wish to remove from your pattern. Draw a straight line across the pattern piece.

Fold the pattern piece at the ‘lengthen/shorten’ line and bring that fold up to meet the line you’ve just drawn. Press the fold down and secure with tape. Make sure that the grainline arrow matches up at the fold.
You can also watch a short video on our Crafty Sew & So Youtube Channel to guide you through the process if you prefer.
Top alteration Tips
Make sure you repeat the process for both front and back of a pattern
If you have a lot of length to add or take away, distribute it evenly at two points in the pattern piece.
Make sure you keep your grain line straight to avoid warping the shape of your pattern. Use a ruler to help as you tape your pattern together.
Don’t forget to consider hems or cuffs when measuring leg and arm lengths. These add or take away further length. Remember you can shorten a garment once it’s made but it’s more difficult to add length.
Don’t forget to make a note of any changes you make to a pattern for next time you sew it! There’s a space in our dressmakers planner for these notes.

Homebody Joggers
Take a look at Sally’s Homebody Joggers review to see how she removed 4 inches from the length to achieve her perfect fit!